|
Whenever Windows XP encounters a problem (that it thinks is serious even if you did not do anything unusual) it creates a dump file. Next time you reboot, you most likely see this error message. Clicking on more information shows error signature and other clumsy details. Typically minidump would be stored in \WINDOWS\MINIDUMP directory. It is not so easy to decipher this information.
Following are some of actions that you can take to avoid this error from cropping up.
1. Temporarily disabling error reporting:
Right-click on my computer–> properties–>advanced tab–>error reporting button – turn on the “Disable error reporting” check box and uncheck the “but notify me” option.
2. Disable Virtual Memory:Right-click on my computer, select properties–>advanced tab–>performance settings–> advanced tab–>virtual memory Click “change” button. Note down the current VM settings (system managed or any customized size. Turn on the “no paging file” bullet, and press the set tab.
3. Delete the paging file:
Reboot. Verify that the option reads 0 kb for page file. Use folder options on control panel or explorer“tools” pulldown menu & go to “view” tab. Turn off check box to permit viewing of system files. Now explorer on the root of C drive (or what ever drive letter you page file was set to use), should show apagefile.sys entry. Delete this. You will get a warning message about this being a system file. Since you have disabled virtual memory, this entry is not being used. Delete it. Go empty the trash bin to make sure this entry is cleared.
4. Re-enable Virtual Memory:
Right-click on my computer, select properties–>advanced tab–> performance settings–> advanced tab, virtual memory Click “change” button , turn on the system-managed or customized paging file with the same settings as you noted down earlier. Be sure to press the set button. Reboot and verify that thepaging file is active. Re-enable error reporting that was disabled earlier. Reboot to verify that the repetitive error message has indeed “left the building”
|
*To create a password reset disk:
1) Insert a Pendrive or blank floppy disk into drive.
2) Open User Accounts in Control Panel.
3) Double-click on your account name.
4) On the left side of the window, under Related Tasks, select Prevent a forgotten password. A wizard will pop up and walk you through the process of creating the password recovery disk.
If the related tasks does not show up you are not double clicking on the user account or you are using a LAN with domains.
*If your computer is on a domain, you can create the Domain Password Reset Disk as follows.
1) Press CTRL+ALT+DELETE to open the Windows Security dialog box.
2) Click Change Password.
3) In the “Log on to” click on the down arrow to select local XP machine.
4) Click Backup to open the Forgotten Password Wizard. If you don’t see the Backup button you did not select the computer in step 3 correctly.
5) Click Next and then follow the instructions as they appear on the screen.
You will be prompted to create a new password. Remember, anyone who has the password reset disk can access the system, so don’t forget to store your disk in a safe place!
|
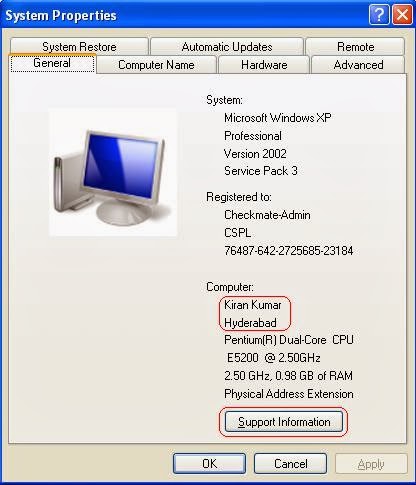
open notepad dump the following lines into it and save it with the name OEMINFO.INI in the c:\windows\system32 directory:
————————————————————————————
[General]
Manufacturer=Your Name Here
Model=Your Model Here
[Support Information]
Line1=Your Name Here
Line2=Your Address Here
Line3=Your Email Address Here
————————————————————————————-
1. Save the file.
2. Then make a right click on my computer select properties, in the general tab a button will be highlighted (support information) make a click on it, you will be able to see the changes.
3. Now if you want to display some more information then simply increase the line in the file.
ex: Line4= .....
|
How to Move a mouse Pointer without a mouse
You can control your mouse pointer with keyboard keys in all windows versions. When your mouse stops working, you can enable this keyboard feature to complete your important work. This keyboard mouse can performs all tasks same like a normal mouse.Follow the given steps to activate the keyboard mouse: - To edit this feature, first you should log onto your computer with administrative rights.
- To activate this feature, press Alt+Shift+NumLock keys at once and you will receive a smallMouseKey box.
- To keep MouseKeys on, click on Ok button or click on cancel button to cancel MouseKeys box.
- Click on Settings button, if you want to adjust the mouse cursor detail settings.
- Here a new dialog box will appear with the title Settings for MouseKeys, now you can manage all mouse settings for example mouse cursor speed, acceleration and some other features.
Now using Numeric keypad, you can move your mouse pointer. The controls are:
- 1,2,3,4,6,7,8 and 9 keys are used to move the mouse cursor into different directions.
- Key 5 is used as mouse click button.
- Insert key used to hold down mouse button.
- + Sign used to double click on any object.
- Delete button used to release the mouse.
- Click on NumLock button to disable this keyboard mouse feature.
|
How to remove write protected error for the Pen drive or Other USB devices:
Some USB Errors Shown:
- Cannot copy files and folders, drive is write protected
- Cannot format the drive, drive is write protected
- The disk is write protected
- Remove write protection or use another disk
- Media is write protected
Some times USB drive becomes write protected and deleting/Copying files or Folders on the USB drive is not Possible.
Let’s now see how to remove write protection on your portable devices like pen drives, memory cards, iPod and other USB mass storage devices.
What Actually causes This Problem?
Write Protection on any portable USB Device can be applied by the physical lock provided on the card adjuster or some times provided on the pen drives, so make sure to make your drive not write protected by moving the lock in right direction.
But even after moving the physical lock for write protection the problem can happen due to some virusaction. This happens when some virus or script which applies the registry hack to make any drive write protect when connected to the computer, In that case follow the procedure below to remove write protection from your pen drive.
1. Open Start Menu –> Run, type regedit and press Enter, this will open the registry editor. 2. Navigate to the following path:
HKEY_LOCAL_MACHINE\SYSTEM\CurrentControlSet\Control\StorageDevicePolicies
Note: If the registry key StorageDevicePolicies key does not exist, you will need to create it3. Double click the key Write Protect in the right pane and set the value to 0 in the Value Data Box and press OK button 4. Exit Registry, restart your computer and then again re-connect your USB pen drive on your computer.
|
How To Create a Shortcut or Hotkey To Safely Remove USB Devices:
Usually we remove Hardware by Clicking “Safely Remove Hardware” Icon Present in System Tray.Instead of doing that we can do a small hack to Launch “Safely Remove Dialog Box” by Creating Shortcut or assigning Hotkey (Best Method)
Create a Shortcut to the Safely Remove USB Devices:
- Right-click on the desktop and choose New –>Shortcut
- Then paste in the following into the location box:
RunDll32.exe shell32.dll,Control_RunDLL hotplug.dll
- Next Give a Shortcut name, here i have given it as Safely Remove
How To Assign a Shortcut Key:
- Right-click on the Created Shortcut icon.
- Open the properties dialog, then go to the Shortcut tab.
- Now Assign a Shortcut key (Here i have assigned CTRL+F9).
- Close the dialog box.
This hotkey will make a Fast launch of Safely Remove Dialog Box
|
Here is a very cool and simple trick to hide any partition of our hard drive on computer. Many times we will think of hiding some confidential data form others.I have shown two easy methods to hide partitions without using any software.
Method 1
Hide Partitions Using Command Prompt
1. Go to Start–>Run.
2. Type Diskpart and press Enter.
3. In the console type List volume to see all the drives available on your PC.
4. Now select the drive which you want to hide.
Here I have shown how to hide D drive.
5. In My PC it is volume 2 for drive D
6. Now to hide drive D type Select volume 2
7. Then type remove letter D , this will hide your drive
8. Now to get your drive back type Select volume 2 and then type assign letter D.
Method 2
Hide Partitions Using Computer Management
1. Right click My Computer.
2. Click Manage or press letter G.
3. This will open Computer Management.4. Under Storage, select Disk Management.
5. Right click on the drive which you wish to hide.
6. Select Change drive letters and paths...
7. Click Remove
8. Now can find your partition will be hidden.
9. To get back the partition Computer Management–>Select drive–> Change drive letters and paths
10. Now select Add option.
11. In that Assign the following drive letter.
12. Select ok.