Trick To Hide Text In Notepad

Steps to hide text in a Notepad
1. Open your command prompt Start–>Run and Type cmd
2. Type cd.. to move to C:\> drive or Type cd desktop to move to your desktop.


3. Type the below code in your command prompt
notepad filename.txt:hidden

4. Write some data and save(Ctrl+S) the file.5. Browse to the file location and Open filename.txt you cannot see any data in the file.6. To retrieve the hidden data open command prompt and type the same command.notepad filename.txt:hidden

How to add options in Add Remove Programs in Control Panel In Windows XP


Sometimes you may wish to add or increase the program / software names in the add remove programs list in the control panel.
For example you don’t get the option of Windows Media Player or MSN Messenger in the add remove programs (there are many components which don’t get displayed in add remove programs)
There is a hack to display the Names of such programs in add remove programs so that YOU CAN EASILY REMOVE THEM. If you don’t want to keep and uninstall windows media player or uninstall / delete / remove msn messenger from your windows, then do the following.
Open “Run” from the start menu (or press WinKey + r ). Just copy paste the following path and hit ENTER.
                                             C:\Windows\inf\sysoc.inf

A section of the file which opens looks like this:
[Components]
NtComponents=ntoc.dll,NtOcSetupProc,,4
WBEM=ocgen.dll,OcEntry,wbemoc.inf,hide,7
Display=desk.cpl,DisplayOcSetupProc,,7
Fax=fxsocm.dll,FaxOcmSetupProc,fxsocm.inf,,7
NetOC=netoc.dll,NetOcSetupProc,netoc.inf,,7
iis=iis.dll,OcEntry,iis.inf,,7
com=comsetup.dll,OcEntry,comnt5.inf,hide,7
dtc=msdtcstp.dll,OcEntry,dtcnt5.inf,hide,7
IndexSrv_System = setupqry.dll,IndexSrv,setupqry.inf,,7
TerminalServer=TsOc.dll, HydraOc, TsOc.inf,hide,2
msmq=msmqocm.dll,MsmqOcm,msmqocm.inf,,6
ims=imsinsnt.dll,OcEntry,ims.inf,,7
fp_extensions=fp40ext.dll,FrontPage4Extensions,fp40ext.inf,,7
AutoUpdate=ocgen.dll,OcEntry,au.inf,hide,7
msmsgs=msgrocm.dll,OcEntry,msmsgs.inf,hide,7
RootAutoUpdate=ocgen.dll,OcEntry,rootau.inf,,7
IEAccess=ocgen.dll,OcEntry,ieaccess.inf,,7
This is a list of all the softwares / components installed currently.
Example: If you want to remove or uninstall msn messenger or windows media player from your windows xp, this list is where you have to edit little things.
In case of MSN Messenger – there is an entry entry called ‘msmsgs’, in the third-last line. There is a word “hide” there. This string tells the windows not to display the messenger in the add remove programs list. You can fix this and apply this hack easily as follows now:
Just remove ‘hide’ but keep the comma after it.
Change the line
msmsgs=msgrocm.dll,OcEntry,msmsgs.inf,hide,7
to this:
msmsgs=msgrocm.dll,OcEntry,msmsgs.inf,,7

Then save that notepad file by selecting Ctrl + S or choosing file -> Save.
Then close the notepad file and restart your computer.
Now you will see the option “msn messenger” in the add/remove programs.
You can show any other hidden software’s name there by just removing hide as we did in this case.

Removable disk icon not visible - Windows XP


Recycle Bin is such a weak name. Personalize your XP installation by renaming your recycle bin to whatever you wish.

1. Click Start
2. Click Run
3. Type regedit and hit ENTER
4. In the registry editor go to the following key:
HKEY_CURRENT_USER\Software\Microsoft\Windows\ShellNoRoam\MUICache
5. Double click on the following value:
@C:\WINDOWS\system32\SHELL32.dll,-8964
6. Change the value to whatever you wish.
7. Click OK and close out regedit
8. Click on a blank area of the desktop and select refresh from the context menu.
9. After the screen refreshes, you recycle bin will be renamed to whatever you decided.

Removable disk icon not visible - Windows XP

Right Click My Computer > Manage > Disk Management > Right Click on the Removable Storage Drive and select Change Drive Letter > Select a new Drive letter not already in use
and restart your computer..


Windows cannot access the specified device path or file


Method 1 – Windows Server 2003 Terminal Services

Firstly, if you’re running into this issue on a Windows Server box running Terminal Services, your problem can be narrowed down to one or two things.
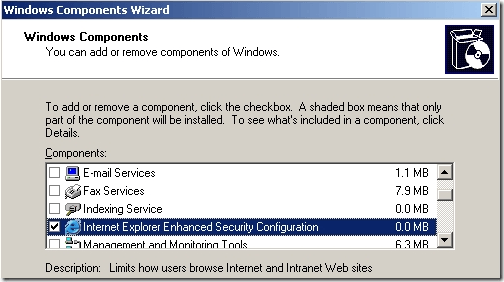
The best solution that has worked for most people is to simply uninstall Internet Explorer enhanced security configuration.


ie enhanced security


If that doesn’t work, another thing you can do is to add the server name to the list of Trusted Intranet Sites in IE.
//servername
Make sure to log off and back on in order for it to take effect. If you’re not running a server, read on.

Method 2 – Turn off anti-virus or firewall

If you are having this issue in Windows XP or Windows Vista, then your problem is probably related to an actual permission issue.
Norton Internet 200X, Bitdefender, AVG anti-virus, Trend Micro 200X can all cause this problem. If you have any of these programs installed, make sure to disable them and test it you can run programs, open files, etc.
If so, then you’ll have to either use a different program or find something on the Internet about to how to configure your software to not interact badly with Windows.
The same thing can also happen with an overly aggressive firewall. If you are running Comodo firewall or something similar (other than the basic Windows Firewall), then disable that also.


Method 3 – Unblock the file

If neither of those two methods worked, the file may be blocked by Windows. Note that this is only for Windows Server 2003 and higher.
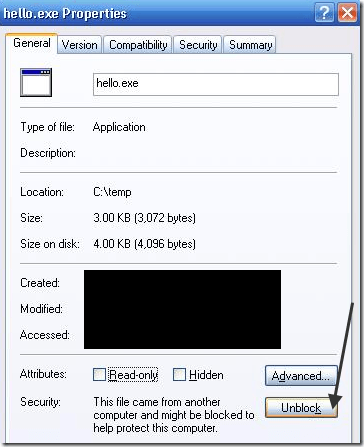
When you copy an EXE file from another computer to a Windows Server 2003 box, there is what is called a blocked property set on the file. This is due to the increased security on servers.
Right-click on the file and choose Properties. You’ll see a button called Unblock at the bottom.


unblock file server 2003


Method 4 – Real permissions issue

Finally, you may actually have a permissions issue. In this case, make sure you are an Administrator or you are part of the Domain Admins group if you are in a domain.
Also, you can try right-clicking on the file and choose Run As. Then type in the Administrator credentials and try to run the file. If you are able to run it, that means you account is not setup properly or is not in the right user group.

rundll32.exe missing windows xp

 Method 1 :
  1. Put the Windows XP CD ROM disk in the CD ROM drive.
  2. Click Start, and then click Run.
  3. Type expand X:\i386\rundll32.ex_ c:\windows\system32\rundll32.exe in the Open box, where X is the letter of your CD ROM Drive.
  4. Restart the computer.
 Method 2 :


Go to the "Start" menu.
Click "My Computer.
Double-click on the "C:" drive.
Double-click on the "Windows" folder
Double-click on the "Dllcache" folder.
Locate the Rundll32.exe file, right-click on it and then select "Copy.
Click on the "Back" button in the Windows Explorer to get back to the "System 32" folder.
Right-click any open space and then click "Paste."

Ntoskrnl.Exe Missing Or Corrupt XP


  1. Start the computer by using your Windows XP CD-ROM. Press any key to boot from the CD.
  2. After the setup files are finished loading press R to repair using Recovery Console.
  3. When you are in the recovery console, select the installation to log on to (usually number 1), and then press ENTER.
  4. Login to the Administrator account by typing the password for this account, and then press ENTER.
  5. At the recovery console command prompt, type the following command, and then press ENTER: 

    For Uni-Processor systems:
    expand <cd-drive>:\i386\ntoskrnl.ex_ <hd-drive>:\Windows\system32\ntoskrnl.exe
    For Multi-Processor systems:
    expand <cd-drive>:\i386\ntkrnlmp.ex_ <hd-drive>:\Windows\system32\ntoskrnl.exe
    Note In these two commands, the <cd-drive> placeholder represents the drive letter of your CD drive, and the <hd-drive> placeholder represents the drive letter of the hard disk on which windows is installed.
  6. If you receive a prompt to overwrite the file, press Y.
  7. Type exit, and press ENTER at the command prompt.

The Windows Installer Service Could Not Be Accessed


  1. Log on to your computer as an administrator.
  2. Click Start, and then click Run.
  3. In the Open box, type cmd, and then click OK.
  4. At the command prompt, typemsiexec.exe /unregister, and then press ENTER.
  5. Type msiexec /regserver, and then press ENTER.
  6. Verify that the SYSTEM account has full control access permissions to the HKEY_CLASSES_ROOT hive in the Windows registry. In some cases, you may also have to add Administrator accounts. To do so:Important This section, method, or task contains steps that tell you how to modify the registry. However, serious problems might occur if you modify the registry incorrectly. Therefore, make sure that you follow these steps carefully. For added protection, back up the registry before you modify it. Then, you can restore the registry if a problem occurs. For more information about how to back up and restore the registry, click the following article number to view the article in the Microsoft Knowledge Base:
    322756  How to back up and restore the registry in Windows
    1. Click Start, click Run, type regedit in the Open box, and then click OK.
    2. Click the following registry hive:
      HKEY_CLASSES_ROOT
    3. On the Edit menu, click Permissions.
    4. If SYSTEM is not listed in the Group or user names list, click Add, make sure that the local computer name appears in the From this location box, typesystem in the Enter the object names to select box, click Check Names, and then click OK.
    5. Click SYSTEM in the Group or user names list, and then select the Full Control check box under Allow in the Permissions for SYSTEM box.
    6. Click Apply, click OK, and then quit Registry Editor.
  7. Restart the computer. Your problem is resolved.

    Search This Blog

    Now!!

    Followers

    About Me

    My photo
    A simple and an ordinary person .. I never think of the future..It comes soon enough!!

    Suggestion Box


    ShoutMix chat widget